










Stop Killing Your Seedlings: The Foolproof Guide to Starting Strong Plants
You’ve got the seeds, the dirt, and the dreams—but somehow those little sprouts always end up leggy, moldy, or just dead. Let’s fix that with some no-nonsense tips that’ll turn you into a seedling whisperer, whether you’re growing a few trays for the garden or stocking up on agricultural supplies for your small farm.
I remember my first batch of seedlings. I was so proud of my little plastic cups on the kitchen windowsill, until every single one stretched into a pale, spindly mess and flopped over like it had given up on life. It wasn’t the seeds’ fault—it was me. I hadn’t really thought about how to start seedlings indoors the right way. Since then, I’ve killed enough plants to know exactly what works, and honestly, it all comes down to treating your seedlings like the tiny divas they are.
First, let’s talk dirt. The best soil for seedlings is not the heavy stuff you dig out of your backyard. That stuff compacts, holds too much water, and hides weed seeds. You want something light, fluffy, and sterile. I swear by a good homemade seedling starter mix—it’s cheaper than the bagged stuff and you can tweak it. Here’s my go-to: mix one part coco coir (or peat moss if you must), one part perlite, and one part screened compost or worm castings. Sift it all together until it feels like a damp cloud. That’s it. You’ve just made the kind of mix that tiny roots absolutely love to dive into. No fancy tools needed.
Now, you need somewhere to put that soil, which is where seedling tray supplies come in. The classic 1020 trays with cell inserts are a lifesaver, and you can grab them anywhere garden supplies are sold. Get trays with drainage holes, a solid bottom tray to catch water, and a clear humidity dome to lock in moisture during germination. A heat mat underneath? Game-changer. It gives seeds that gentle bottom warmth that tells them it’s time to wake up. Oh, and don’t forget labels—trust me, you will not remember which tomato is which a month from now.
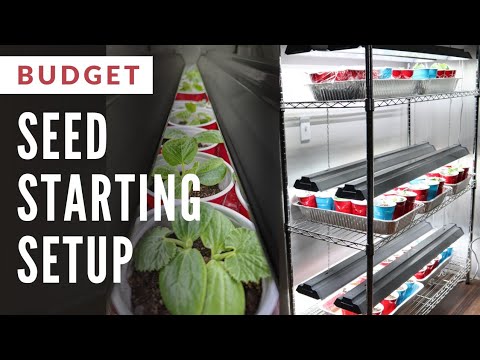
When you’re setting up, figuring out how to start seedlings indoors isn’t just about plopping seeds in soil. Light is the real secret. You’ve probably heard people ask, “what is a grow light for seedlings?” Honestly, it’s just an artificial light source that mimics the blue and red spectrum plants need to photosynthesize without stretching. Your sunny windowsill is a lie unless you’re in a greenhouse. A simple LED shop light hung a couple of inches above your trays does the job beautifully. Keep it on for 14–16 hours a day, and raise it as your plants grow. No legginess, no drama.
Watering is where most folks mess up—me included. A proper seedling watering schedule isn’t a timetable; it’s more of a feel thing. You want the soil moist like a wrung-out sponge, never soggy. I bottom-water my trays by pouring water into the bottom tray and letting the cells soak it up for 20 minutes, then dumping the excess. This keeps the soil surface dry and prevents damping off, that sneaky fungus that fells seedlings overnight. Check them every morning. If the top looks pale and dry, give them a drink. If they’re droopy and the soil’s wet, back off.
As they grow, those little sprouts get hungry. The seed’s own food supply runs out once the first true leaves appear, so you’ll need to think about seedling fertilizer types. Steer clear of anything strong or synthetic early on—it’ll burn their delicate roots. I use a diluted liquid fish emulsion or kelp mix, about half the recommended strength, every week or two. Some people love worm casting tea; others go for a balanced liquid organic feed. The key is gentle, consistent nutrition. You’re feeding, not force-feeding.
Here are a couple of seedling growing tips I wish I’d known sooner. First, air circulation is a silent superhero. A tiny fan oscillating on low near your plants makes stems sturdier and keeps fungal problems at bay. Second, thin ruthlessly. If you sowed multiple seeds per cell, snip the weakest ones at soil level once they germinate—don’t yank them out and disturb the roots of the keeper. It feels cruel, but one healthy plant beats three sad ones.
Once your seedlings are looking robust and the weather is warming up, you can’t just toss them outside and hope for the best. You need a seedling transplanting guide etched in your brain: harden them off. That means gradually exposing them to outdoor conditions over a week or so. Start with an hour in a shady spot, then increase the time and sun exposure daily. This prevents transplant shock that can undo all your hard work. When you plant them out, bury those tomatoes deep (right up to their first leaves) but keep lettuce crowns above soil. Water them in well, and maybe whisper an apology for the times you almost drowned them.
Now, if you’re doing this on a larger scale—like stocking up on agricultural supplies for a small farm—the game changes a bit but the principles hold. You’ll want bulk seed-starting mix components, sturdy wire shelving to rack trays under lights, and maybe a soil block maker to ditch plastic cells altogether. A dedicated germination chamber or a repurposed fridge with a heat controller can handle dozens of trays at once. And your seed choice? That’s a whole other conversation, but don’t skimp on quality. The same tender care applies, just multiplied.
I guess what I’m saying is, seedling cultivation isn’t about having a perfect green thumb from birth. It’s about understanding a few basic needs—soft soil, steady light, smart water, a light touch with food, and a gentle transition to the great outdoors. Once you get those rhythms down, you’ll look at a tray of sturdy little plants and feel like a wizard. And honestly, there’s no better feeling than biting into a tomato you coaxed from a speck of a seed. So go on, grab some trays, mix up that fluffy starter, and get growing. You’ve got this.