











Don’t Let Your Harvest Wilt, Rot, or Get Buggy—Here’s How to Keep Every Bit of Goodness Fresh
You’ve spent months nurturing your plants, sweating under the sun, and finally, the harvest is here. The basket’s overflowing with bright peppers, the grain bin is full, and it feels like victory. Then, a week later, half the lettuce is slimy, the beans are starting to speckle with mold, and you see tiny moths fluttering near your rice. It’s heartbreaking, right? I’ve been there. That’s why I want to walk you through the whole post-harvest journey like a friend who’s made all the mistakes so you don’t have to. By tweaking a few handling habits and storage setups, you can seriously reduce post harvest losses and keep more food on the table or more cash in your pocket.
Let’s get one thing straight: the moment you pluck, cut, or dig up a crop, it starts a race against time. Living tissue is now cut off from its water and nutrient supply, and it’s breathing, heating up, and attracting every microbe in the neighborhood. The good news? You have a ton of control if you jump in early with the right post harvest handling practices.
Start by imagining you’re a grain farmer. You’ve just combined your maize, wheat, or paddy. The kernels might be a bit damp from morning dew or the field itself. If you pile them straight into a silo or bag, you’re asking for trouble—heat builds up, mold flourishes, and insects think it’s an all-you-can-eat buffet. So how to store grains without that despair? It all begins with drying. I’m not talking about leaving them out on a tarp for an afternoon; you need proper crop drying techniques. For smallholders, a simple raised mesh rack and a fan can work wonders if you stir frequently. On a larger scale, mechanical dryers with controlled airflow gently bring moisture down to safe levels—often around 13-14% for grains—without cracking kernels. The right post harvest processing equipment here can be a game-changer: moisture meters, threshers that don’t damage the seed, and even solar dryers that trap heat like a mini greenhouse. Once the grain is dry, pick your post harvest storage methods wisely. Hermetic bags, which seal out oxygen, can suffocate pests without chemicals. Metal silos keep rodents at bay. And here’s a little secret: never mix new harvest with old grain, because those few older kernels might already carry hidden insect eggs, and suddenly your whole stash is infested.
Now, let’s swing over to the colorful world of fruits and vegetables. They’re way more finicky than grains because they’re still breathing hard and losing water like crazy. The best storage conditions for vegetables aren’t just “cool and dark” generically; each crop has a personality. Potatoes love it around 7-10°C with high humidity, but if you drop them below 4°C the starch turns to sugar and they taste oddly sweet even when fried. Tomatoes, on the other hand, lose flavor fast in a fridge—keep them at room temperature with stem side down, and only chill fully ripe ones for a day or two if you must. For leafy greens, think crisp and hydrated: wrap them loosely in a damp cloth or paper towel inside a perforated bag. That’s one of those fruits and vegetables storage tips that makes you feel like a kitchen wizard.
Temperature control for stored crops is the single biggest lever you can pull to slow down spoilage. Every 10°C drop in temperature roughly halves the rate of respiration and decay. So what does that mean for you? If you’ve brought in a crate of apples or cabbages from the field, get the field heat out immediately. Even a couple of hours in the shade with a breeze can help, but if you can integrate a cold chain—like a coolbot-enabled room, a root cellar, or an evaporative cooling chamber—you’ll see a dramatic drop in wilting and rot. For carrots and beets, burying them in slightly damp sand in a cold basement was my grandmother’s trick, and it’s still gold today. The idea is to keep them asleep, not freezing, and not too dry. That’s how to prevent spoilage in storage without fancy tech.
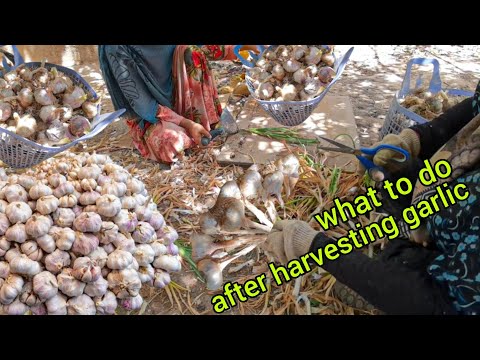
But walk with me through the minutes right after harvest, because that’s where many small mistakes pile up. Imagine you’re handling delicate berries. You pick them into shallow containers so they don’t crush each other. Then, instead of dumping them into a big bin, you immediately move them to a shaded sorting area. You gently rinse only what you’ll use soon—wet produce in storage invites mold. For crops like onions and garlic, curing is a non-negotiable step: spread them out in a warm, well-ventilated spot for a couple of weeks until the necks dry tight. That cure creates a protective wrapper. Then, hang them in mesh bags in a cool, dark, dry pantry. This kind of careful post harvest handling practice can double or triple the shelf life.
You know what? Many people overlook the power of simple infrastructure. Even a white-painted roof over a storage area can reflect heat and keep temperatures down. You don’t need a massive investment in post harvest processing equipment right away. A cheap plastic crate with slatted sides allows air circulation around your pumpkins or squash, preventing the soggy spots that show up when they sit directly on a concrete floor. I once saw a small cooperative cut their fruit waste in half just by building a shelter with mesh walls and a thatched roof—evaporative cooling in action. They used a charcoal-filled wall kept damp, and the air coming in was noticeably cooler. That’s a brilliant, low-cost way to achieve temperature control for stored crops.
Let’s circle back to grains for a moment, because even after you’ve nailed how to store grains, you need to stay vigilant. Check your stored grain weekly, literally plunge your hand in the middle or use a probe to feel for warm patches. If you catch a hot spot early, you can aerate or move the grain to stop it from cascading into a full-blown mold outbreak. And those grain storage silos? They’re part of the bigger picture of post harvest storage methods that also include modern silo bags that sit right in the field, hermetically sealed, buying you time until you can get to market. All these steps, from the moment of harvest to the final sale or plate, collectively reduce post harvest losses, which the UN estimates can be as high as 40% in some regions for perishables. That’s not just a statistic—it’s food that could have fed someone, income lost, and resources wasted.
At the end of the day, you don’t need to be a wizard. Just start thinking like a guardian of freshness. Harvest in the cool morning hours. Handle produce like eggs. Dry grains to the right moisture content and store them somewhere dry and pest-proof. Match your fruits and vegetables storage tips to each type’s preferences—cold and humid for most greens, a bit warmer and dry for winter squash. Keep an eye on the thermostat, because temperature control for stored crops is your silent superhero. And don’t be afraid to improvise with the tools and equipment you have; a simple fan, a shade cloth, a good thermometer—they’re all part of the post harvest processing equipment family that keeps your harvest alive a little longer.
Treat your harvest right after you pull it from the earth, and it’ll give you weeks or months of abundance instead of a race to the compost pile. And honestly, there’s nothing quite like pulling out a perfect, crisp apple you stored four months ago, knowing you did that.